Posts mit dem Label Designing a "DriZzleR" werden angezeigt. Alle Posts anzeigen

25. Mai 2014

A simple DriZzleR, to learn - Ein einfachigen DriZzleR, zum lernen

Hi Fellow DriZzleRs,

I get mails from people who want to know the last little detail; how a DriZzleR is build and what its specific measurements are. This questions are difficult for me to answer because, the DriZzleR is still a work in progress and I changes and adapt my actual gasifier constantly. But then again I thought,  When I can not give fisch I can give a fisching rod, so enthousiasts can have a first start and from there on with their own creativety can develop their DriZleR concept further.
So here is a video of a very simple build, that can be put together in some two hours, and gives you the opprtunity to start DriZzling inmediatly after.
Beware, this is just the gas generator, no cyclone, no cooler, no filter and so on. You can find a lot of information on those items elswhere.
I have not yet flared this little unit myself so I do not know how it preforms, but how it preforms is not important at this moment. The aim of this little machine is nothing more than just let you feel the magic of producing your own first gas from wood. After that you will be probably been hooked and able to go your own way further.
Enjoy the build and the flaring.
Here comes the video


Succes!!

Luk

14. März 2014

Designing a "DriZzleR"

Hi Folks,
We have some fine Drizzler Builders in Europe already. You can follow their work on our blog www.thedrizzler.org (two languages, English... or something that looks like English), and German. Or maybe you visit the German woodgasforum http://www.holzgibtgas.com/viewtopic.php?f=60&t=8118&start=90 (only German but lots of pictures who tell more than tousend words).
In Amerika it seems a bit silent. There winter is still very hard and man and woman do not leave the hause let go to the barn to weld or build things in frosen metal.
As more new builders are experimenting with “The DriZzle Method” new experiences are gathered too. Recently we learned a lot on how the restriction should be designed in a “DrizzleR”.  People that remember the struggle to calculate a well balanced imbert with its many variables on Nozles, restriction, reduction... will be glad to hear that the designing of a DriZzleR can be done visualy and intiutive. In fact, since in a DriZzleR all is hapening in the Flaming Pyrolyse, one only has to care only to keep that zone hot enough to crack tars. If the DriZzleR  zone is not hot enough one visualy observe problems connected to that. A nice thing too is that unlike in an Imbert the restriction in a DriZzleR is not very critical. There is a wide tolerance.
As a simple rule of thumb the size of the restriction depend on the pull and the fuel. If little pull from your blower or low energy fuel is used one should choise an rather narrow restriction. However never smaller than 2 inch (better start at 50mm). By high energy fuel, such as pellets, or strong pull, one can largery widen the restriction. 100mm, 120 mm sometimes 140 mm still function well. With pellets you can do not much wrong. They have a high heat value, they keep the DriZzler zone hot enough and they flow nicely and desintegrate to nothing but dust. Chips is a more dificult fuel. Specialy when they are bigger in size.  Observe in case of using chips the building of bridges,  hollow burns, problems to keep your DriZzle zone at the same height or when your charcoalbed  gets too fast succed away, then chosse a larger restriction. Those phenomen practicaly always have to do with a too narrow restiction.
Next thing is the calculation of the reduction. Again very simple and not critical. Keep above your grate a charcoalbed between 60 and 100mm.
A good dimension for a strong pulled DrizzleR can be for instance. A DrizzleR tube of about 200mm, 500mm long and closed one side. In the closed side an opening of 120mm covered with a grate with lots of holes of some 8mm. Fill up above the grate with 80mm fine charcoal (1.5cm square) let glow completely (do not get impatiened) fill up a little more if it has suncked down.
When the coalbed stays on his level start pooring in a handfull of chips maybe every 20 seconds. (If your Drizlebed lowers or mount, adapt the time interval  “DriZzling in” acordengly)

Luk

Hallo Leute,

Wir haben einige schöne DriZzleR Nachbauten hier in Europa. Sie können diese in Nachbauer und Ihre Vergaser in unserem  Blog unter www.thedrizzler.org bewundern. (zweisprachig, Deutsch und Englisch. oder etwas, das aussieht wie Englisch). Oder Sie besuchen das Deutschsprachige HolzGibtGas Forum http://www.holzgibtgas.com/viewtopic.php?f=60&t=8118&start=90 (Alle Artikel sind nur in Deutscher Sprache verfasst, aber es gibt auch viele Bilder, welche mehr als tausend Worte sagen).
In Amerika scheint es ein wenig Still geworden zu sein. Es ist immer noch ein sehr harter Winter und Mann oder Frau verlassen wohl nicht Ihre Häuser um in der Werkstatt bei frostigen Te,peraturen Metal zu schweißen oder andere Dinge zu bauen.

Immer mehr neue Nachbauer versuchen sich an der "DriZzleR Methode" und experimentieren und sammeln neue Erfahrungen. Kürzlich haben wir sehr viel dazugelernt. Wie z.B. die Reduktion in einem "DriZzleR" umgesetzt werden sollte. Alle die sich, an die ewig andauernden Diskussionen der Imbert Systeme erinnern können aufatmen. Die Imbertvergaser mit Ihrer Ausgewogenheit zwischen den einzelnen Komponenten wie Düsen Berechnungen, Einschnürung und Reduktion sind Schnee von gestern. Der DriZzleR kann durch Beobachtungen des Vergasungsprozesses zum Erfolg gebracht werden. Das Wichtigste im DriZzleR ist in der Tat die "Flammende Pyrolyse" man muss verstehen wie sie funktioniert und sich zuerst um diesen Part auseinander setzen. Die Zone muß heiß genug werden um Teer aufzuspalten und immer auf gleicher Höhe gehalten werden ohne abzusacken. Wenn die DriZzeL Zone nicht heiß genug wird sieht man das schnell ander Flamme. Eine weitere schöne Eigenschaft des DriZzleR´s ist auch, dass anders als in einem Imbert System die Beschränkung in einer DriZzleR nicht so kritisch sind. Der DriZzleR verzeiht und lässt viel Spielraum für große Toleranzen.

Eine einfache Faustregel beim DriZzleR ist, die Größe der Reduktion hängt von der Saugkraft und den Brennstoff ab. Wenn man wenig Saugkraft nutzt sollte man die Reduktion lieber etwas kleiner einplanen. Allerdings niemals kleiner als 2" (oder auch ca 50mm) Was mit Pellets gut funktioniert kann mit Hackschnitzeln zur katastrophe werden. Also überlegt euch vorher für welchen Brennstoff Ihr den DriZzleR baut. Pellets besitzen sehr viel Energie und haben auch bei großen Reduktionen eigendlich nie Problem hohe Temperaturen aufzubauen. Sie sind ein genormter brennstoff mit guten Fließeigenschaften durch Ihre Größe und erzeugen als Endprodukt nix als Staub. Bei Hackschnitzel ist die Vergasung etwas Problematischer. Sie können Brücken bilden, der Heizwert ist wesentlich geringer als bei Pellets und man kann Probleme bekommen die DriZzel Zone auf der richtigen Höhe zu halten. Man merkt schnell das der Vergaser unter der Reduktion regelrecht leergesaugt wird. Dann wählt man eine größere Reduktion und testet erneut. Bis sich bei der gewünschten Gasmenge und Saugkraft das Holzkohlebett selbständig in Position hält.

Die nächste Vergasungsstufe ist recht einfach und unkritisch. Die Reduktion. Achtete einfach darauf der Rost mit einer 60-100mm hohen Holzkohleschicht bedeckt ist.

Ein guter Abmessungsvorschlag für einen DriZzleR bei starker Saugkraft kann z.B. ein Rohr mit 200mm im Durchmesser und 500mm in der Höhe sein. Die eine Seite dieses Rohres verschliesst man bis auf eine mittlere Öffnung von 120mm wo man den Rost einlegt. Der Rost besteht aus vielen Löchern mit ca 8mm Durchmesser. Dann füllt man über den Rost ca 80mm feine Holzkohle auf (maximal 15mmx15mm). Diese Zündet man an und wartet bis sie komplett glüht (nicht ungeduldig werden). Wenn das Holzkohlebett am Anfang nach unten wandert. Dann füllt einfach ein bisschen mehr Holzkohle nach.
Wenn die Holzkohle Ihr Level hält kann der DriZzel Vorgang starten. Man gibt dazu vielleicht alle 20 Sekunden eine Handvoll Hackschnitzel hinnein. Wenn das DriZzeL Bett steigt oder fällt ändert man einfach den Zeitintervall vielleicht dann nur alle 25 Sekunden eine handvoll.

Luk

13. Februar 2014


Hinweise zum Bau eines DriZzleRs

 Hier sieht man einen Schema des DriZzleR´s. Die Temperaturen in den einzelnen Zonen varieren je nach Gasmenge die benötigt wird. Bei größerer Gasmenge steigen die Temperaturen an bei niedriger Gasmenge fallen sie wieder ab. Nun kommt es auf die Dimensionen an. Wenn man einen DriZzleR bauen will gibt es die Möglichkeit einen Universal DriZzleR zu bauen der mit verschieden Gasmengen zurechtkommt. Auch der Brennstoff den man verwenden ist ein entscheidender Faktor beim planen des DriZzleR´s. Besser jedoch ist es einen DriZzleR zu bauen der auf den passenden Motor abgestimmt ist. 
Betrachten wir es an meinem Setup. Ich benutzte eine Brennkammer von 150mm Durchmesser. Diese Größe ist für Pellet und auch für Hackschnitzel ideal geeignet bei einem:

Honda EX5500 Generator mit 0,4l Hubraum bei 3600 Umdrehungen unter maximaler nutzbarer Last von 3kW. benötigt 9,5l/s warmes Gas bei 350°C:
Auch der VW Motor kommt mit seinen 1,6l Hubraum bei 1500 Umdrehungen zurecht.  Er benötigt unter Last 15,8l/s warmes Gas bei 350°C.

Der VW benötigt also ungefähr die doppelte Menge an Gas. Auf Pellets ist das in diesem Setup auch kein Problem, da Pellets sehr klein sind und viel Energie besitzten. Allerdings lassen sich mit diesem Vergaser für den VW keine Hackschnitzel vergasern. Die Reaktion ist dann einfach zu langsam und der Motor saugt zu stark.

Also müsste man für den Hachschnitzelbetrieb die Brennkammer erweitern. bei 200-250mm sollten auch Hackschnitzel keine Probleme mehr machen. 

Wichtig ist nur das man, dass bei der Planung und beim Bau des DriZzleRs beachtet. Wenn man dann allerdings mit dem Honda diese Vergaser nutzten möchte könnte es wieder Probleme mit der Temperatur geben, da der Honda das Glutbett eventuell nicht genug aufheizen kann. 

Notes for building a DriZzleR

Here you can see a schematic of the DriZzleR. The temperatures in the different zones vary even after gas quantity that is needed. Temperatures increase with larger amount of gas at a low amount of gas they fall off again. Well, it depends on the dimensions. If you want to build an universal DriZzleR Gasifier there is the possibility to build that can handle different amounts of gas. Also, the fuel use which one is a key factor in the planning of a DriZzleR Gasifier. Better it is to build a System which is tuned to the right engine.

We look at it on my setup. I used a combustion chamber of 150mm diameter. This size is ideal for pellet and also for wood chips.

for the Honda EX5500 generator with 0.4 liter displacement at 3,600 rpm with maximum usable load of 3kW. requires 9.5 l / s warm gas at 350 ° C.

Also the VW engine comes with 1.6 liter displacement handle at 1500 rpm. It needed under load 15.8 l / s warm gas at 350 ° C.

The VW requires about twice the amount of gas. On the pellets is not a problem in this setup, because pellets are very small and have lots of energy. However, no wood chips. The reaction is simply too slow and the engine sucks too strong.

So you would have for the chipped material operation expand the combustion chamber. at 200-250mm wood chips should make no more problems.


10. Februar 2014

Designing a "DriZzleR"

DriZzling can be done in a broad range of machines. The whole trick to become engine grade gas, is the strange fuel feed technique, already in broad expleaned on this blog" wich is called "The DriZzling method". Not the machine is important, but the fuel feed.

There are people converting a classical "Imbert" design. Others adapt a FEMA and some just build a new unit based on the simple sketch posted on the Yahoo woodgas group.
All have a lot in commen, the new ones and the adapted ones. The most specififique charasterics beeing the gasifier complete open top and not needing Nozle's to fix the oxidation, nor suply oxigen.

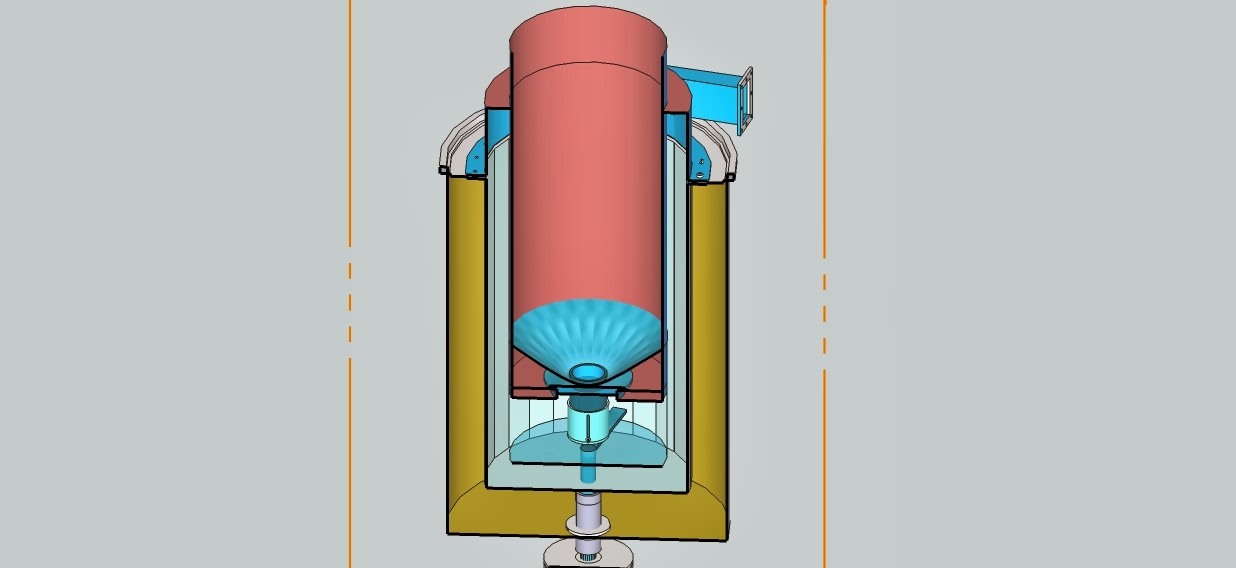
However, as lot's of people asking for drawings and design guides, me and Pascal started talking how an gasifier best suited for "DriZzling" should look like.
We put some design rules up front, such as; the gasifier should be easy to clean. All parts should be fast accesable. The "DriZzleR" should be flexibla and adaptable for differnt fuels. It should be made with ready available of the shelve materials and easy to build or assemble.

Although not yet build the result of this talks let to a first concept, which you find herunder.

Beware. We are also still in the laboratory stage of the developing of the "DriZzleR" and the "DriZzleR Method", changing and learning everyday. Putting the drawing here does not mean that this concept will be build like this, but is is a start. We sure will keep you informed on how this concept gets materialised and how the tests will look like.


Any sugestions more than welcome

Luk Vanhauwaert